Category Archives: One Crafty Contest

Elegant Wire Wrapped Ring

Besides being a contestant in the 2013 One Crafty Contest, I also signed up to be a sponsor. My prize donation was a wire wrapped ring with the contestant’s choice of beads and color.

Shannon at Bella Caiden, won the ring as part of her prize pack for taking 3rd place. She is mighty crafty! I suggest checking out what she made for the contest and browsing her blog. She has some great ideas.

Shannon and I have become pretty good bloggy friends through the contest, so I was excited that she was the one getting this ring. She decided to leave the bead and color choice up to me. I loved this, because I got to be creative! I decided to keep it simple and elegant. This is what she will be receiving.

Elegant Wire Wrapped Ring
Wire wrapped jewelry is one of my absolute favorite things to make, and wire rings are my favorite type of jewelry to make.  I have lost count of how many rings I have made, sold, or given as gifts.  I LOVE rings!

5 Comments

Filed under Jewelry, One Crafty Contest, Wire Wrapping

Washer Suncatcher/Wind chime

I made it through ANOTHER round of the One Crafty Contest! I still can’t believe I was voted in as a contestant let alone that I’ve made it so far! Thank you to everyone who has been voting and sending me kind words of encouragement. You can find all my past projects and read about my participation in the contest HERE.

DIY Washer Suncatcher/Wind Chime
The latest round required us to use glitter. My entry was this washer and cookie cutter suncatcher/wind chime. It was NOT, however, my first project, and was really only half of what I wanted my final entry to be.

DIY Washer Suncatcher/Wind Chime
(it’s  hard to make out the letters without the glitter coloring each letter)

I worked SO hard on garden art made out of washers. I spelled out the word “bloom” with different sizes of washers and made the curves of the letters into flowers. I had the whole thing glued together (I even super glued my finger to a cookie sheet in the process). I had the washers glittered, but then I moved it to keep it safely away from my kids, and the whole thing broke since the super glue wasn’t set yet! I had planned to make it the top of my wind chime instead of the rod I used. So instead, I added the cookie/fondant cutters to my final project so it wasn’t so plain. I guess it was meant to be though, because the final project was good enough to put me in the top 5!

This project was actually pretty easy, but really time consuming. It required A LOT of drying time.

DIY Washer Suncatcher/Wind Chime
I covered cookie sheets with aluminum foil and then put wax paper on top. I started by laying out the different sizes of washers until I had a pattern I liked. Then I decided how many colors of glitter to use and what order they would be in. I filled the center of each washer with Mod Podge. It worked best to fill it with a thin layer, but not so thin that it would pull away from the sides as it dried. To prevent drips, I filled a children’s oral syringe with the Mod Podge. It worked perfectly! I filled the cookie cutters the same way.

DIY Washer Suncatcher/Wind Chime
Then I sprinkled on the glitter and waited, and waited, and waited for it to dry. Because of the deadline for the contest, I ended up putting the cookie sheets in my oven on the lowest temperature to speed dry the Mod Podge. The cookie cutters were especially slow to dry, so they spent several hours in the oven! I would have preferred to let it all air dry. The oven made some of the wax paper fuse to the back of the washers. The ones that did air dry popped right off the wax paper.

DIY Washer Suncatcher/Wind Chime
(here you can see the wax paper that fused to the back of the washers and some undried glue in the cookie cutters)

When it was mostly dry, I shook off all the extra glitter. The Mod Podge dries clear, so it created a little window in the middle of each washer with suspended glitter (unfortunately the pictures don’t show this well). Then I laid out all the washers the way I wanted it to look in the end, but upside down so I could glue strong fishing line to the back of each piece.

DIY Washer Suncatcher/Wind Chime
I primed and spray painted a wooden dowel in a metallic silver to match the washers. I tied on each string of the wind chime, measured carefully so they were evenly spaced, and then glued each of the tied strings to the dowel so they wouldn’t slide around. All that was left to do was hang it up!

DIY Washer Suncatcher/Wind Chime

DIY Washer Suncatcher/Wind Chime
(So pretty! I actually used ultra fine iridescent cosmetic glitter for all the white pieces to give it extra sparkle!)

Remember, if you post about this project, please be sure to give me credit and link back to me or grab a button from the sidebar. Thanks!

Your opinions and thoughts mean a lot to me.  I would love for you to leave me a comment below.  Thanks for stopping by today!

4 Comments

Filed under DIY - Do It Yourself, One Crafty Contest, Spray Paint, Upcycled

Washi Tape – Flowers, Butterflies, Hearts, and Spires!

Beaded washi tape vase with washi tape floral embellishments.
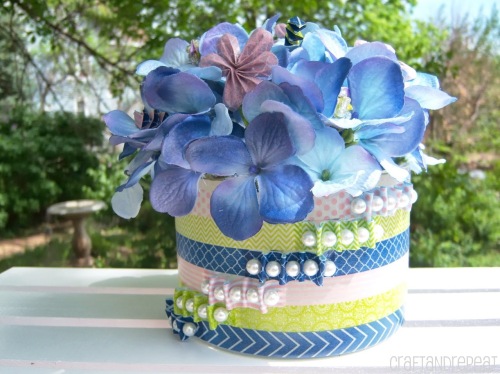
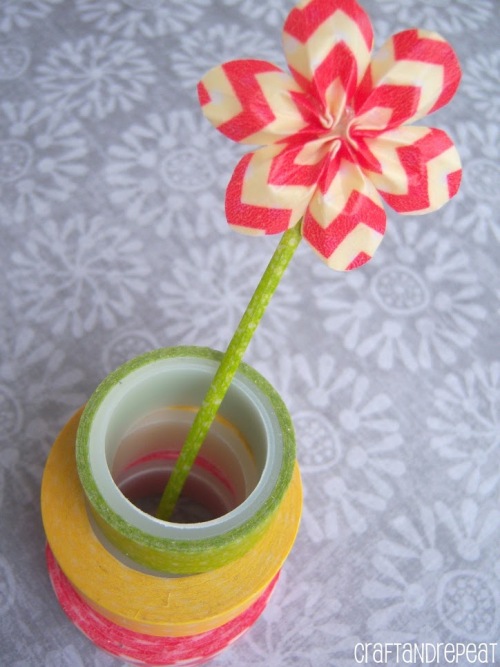
I made it through another round of the One Crafty Contest! Another big thank you to everyone who voted! You can read about my participation in the contest here and see my round 1 paint project here. We had to feature washi tape in this round.  I had never used it before, but can now understand why people get so obsessed with it!  The above picture was my entry.  I’m now in the top ten! I’m excited, but nervous.  It’s getting more serious each round, and I’m up against some amazing talent.  Our next project has to feature glitter.  Make sure to check back to see what I make!

Beaded washi tape vase with washi tape floral embellishments.
Here is the description I sent in with my entry:
“I really wanted to do something different for this round besides just sticking my tape on something and calling it a day. I decided on a craft where I could use the washi tape in several different ways. I hand stitched pearl beads to each layer of the tape that covers the vase. Then I staggered the layers to create a cascading effect. Using two different colors of tape, I folded little accordion style spires. I also hand stitched AB beads to tape and stitched little washi ruffles out of it. I made tiny, two-toned, six-petaled washi flowers. They have stems made out of jewelry wire that are wrapped in green washi tape. The spires, ruffles, and flowers are all staggered throughout the floral arrangement. This project required a lot of stitching, a lot of little folds, a lot of patience, and a lot of time spent in front of the TV! I think it would make a fun addition to any spring decor.”

Washi tape floral embellishments. Tutorials with lots of pictures.
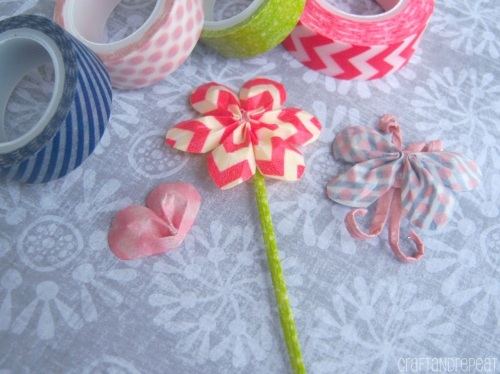
I didn’t take any in-progress pictures for this project (oops!).  I was too busy trying to get it to look just right.  So instead, I made some more of the embellishments, took pictures, and have the tutorials for you! I’ve already received a few requests for a tutorial on the flower.  So we’ll start with that.

This is a really simple folding technique that I found by Kara at scrapbook.steals.com. She gives credit for her post to fancypantsdesigns.com.  While they used paper to make flowers, I used the folding technique to make washi tape flowers, but I also realized I could use this technique to make butterflies and hearts!

The Supplies
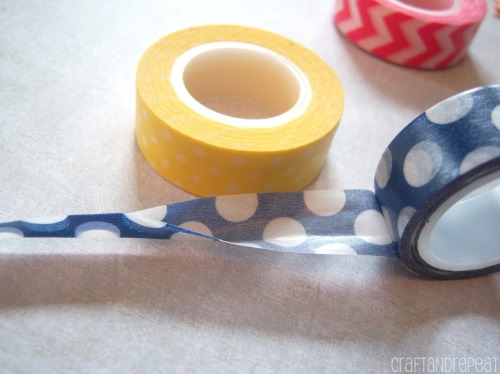
1. 3 colors of washi tape (2 the same width for the petals and 1 for the stem)
2. ruler
3. scissors
4. choice of clear drying glue (I suggest high temp hot glue or mini glue dots)
5. jewelry, craft, or floral wire – 20 to 24 gauge
6. wire cutters
7. nylon jaw flat nose jewelry pliers (optional)

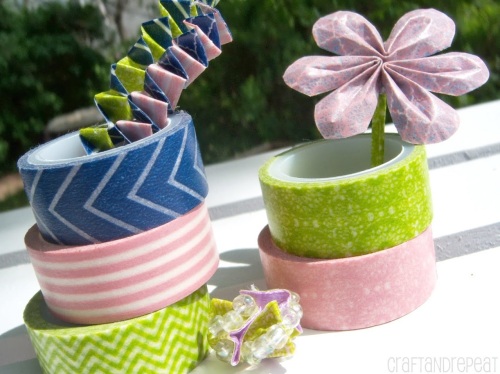
I made my flowers 2 toned.  One color of washi tape is on the front and the other is on the back.  I love how most washi tape has some sort of see-through pattern.  If you want yours 2 toned too, choose colors and patterns that will look good together.  For my contest entry, I did light pink and dark blue, to get lavender flowers.  For this tutorial, I am using red and yellow.

The Directions
Washi tape flowers, butterflies, and hearts. Free tutorials with lots of pictures!
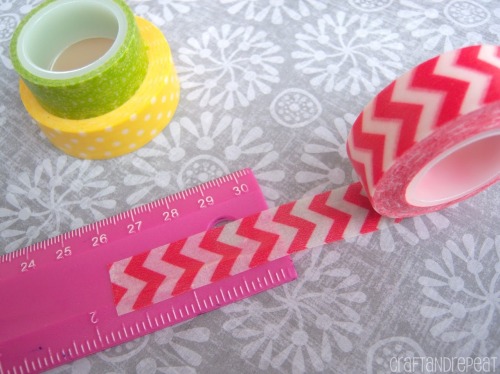
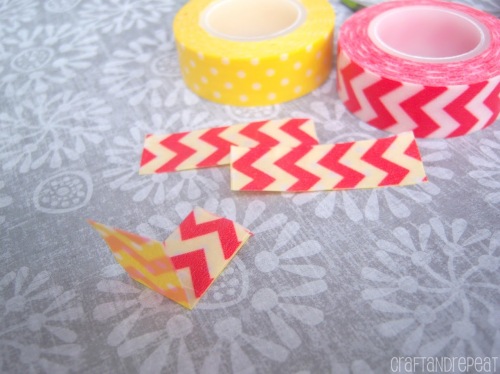
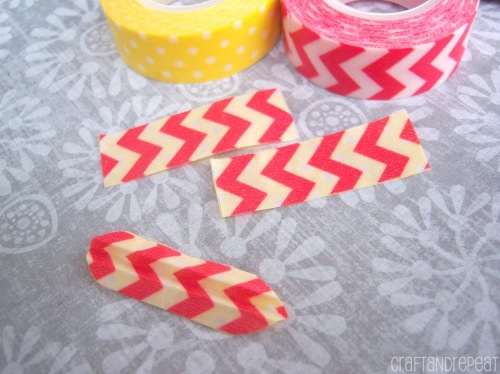
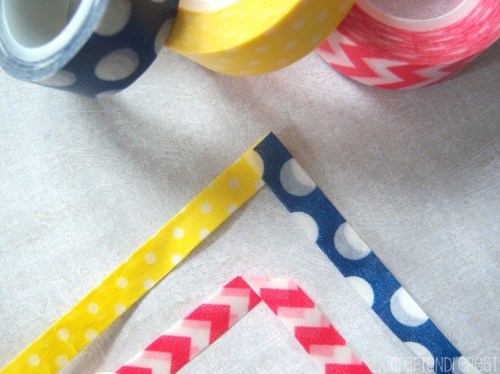
First you will need to cut and measure one of your flower colors.  I found I liked the way my petals looked by cutting a piece that is 1 3/4 inches using standard sized washi tape (15mm wide).  Just stick the end of your tape at 1 3/4 inches on the ruler and let it hang off the edge to cut it.  Line up the cut tape, with the sticky sides together, on the second color for your flower.  This might take a few tries to get it straight, especially if you don’t have obvious patterns or your ends aren’t cut straight.  No worries though!  The tape will easily come apart to try again! Cut the second color where the edge of the first color ends.  You can pinch the tape with your finger and thumb and swipe with your thumbnail to smooth out any wrinkles or creases. Repeat until you have 3 of these little strips. Or 3 x the number of flowers you’re making.  Stack the 3 strips on top of each other to do any necessary trimming to make sure they are all the same length.  Make one more smaller strip that’s about the size of a square for each flower.

Washi tape flowers, butterflies, and hearts. Free tutorials with lots of pictures!
Fold a strip in half so that the short ends meet.  At this point don’t worry about what color is on top or bottom.

Washi tape flowers, butterflies, and hearts. Free tutorials with lots of pictures!
Then fold it in half length wise.

Washi tape flowers, butterflies, and hearts. Free tutorials with lots of pictures!
Turn it so that the short side with the fold is on the left, and the long side with the fold is on the bottom.  Starting at the bottom right, cut a small curve going up to the top.  This will be the rounded part of your petals.

Washi tape flowers, butterflies, and hearts. Free tutorials with lots of pictures!
Unfold the entire thing.

Washi tape flowers, butterflies, and hearts. Free tutorials with lots of pictures!
Now fold it in half length wise with the color that you want as the FRONT of the flower on the INSIDE of the fold.

Washi tape flowers, butterflies, and hearts. Free tutorials with lots of pictures!
Grab one of the 2 flaps and fold it back up to meet the edge of the last fold you created.  Turn it over and do the same thing.

Washi tape flowers, butterflies, and hearts. Free tutorials with lots of pictures!
It should look a little like an accordion.

Washi tape flowers, butterflies, and hearts. Free tutorials with lots of pictures!
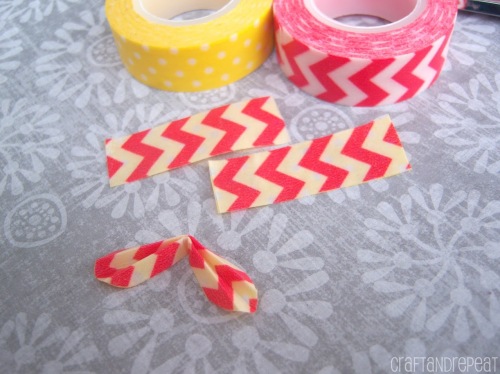
Now fold the whole thing in half.  You should see a crease line as a guide from the first folds you made.

Washi tape flowers, butterflies, and hearts. Free tutorials with lots of pictures!
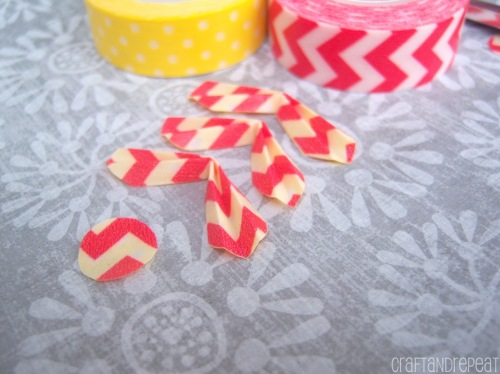
Make petals out of the other 2 strips using the same steps. Cut a small circle out of the 4th strip you made. This will be the base of the flower.

Washi tape flowers, butterflies, and hearts. Free tutorials with lots of pictures!
Add a very small amount of glue (I suggest hot glue or mini glue dots) right inside the last fold you created to keep the 2 petals next to each other.  Do not glue the entire length of the petals.  You want them to flare out some from each other. Hold each set of petals by the middle fold with the front color facing up, and run a finger underneath each petal to shape it by pushing up on the center fold.

Washi tape flowers, butterflies, and hearts. Free tutorials with lots of pictures!
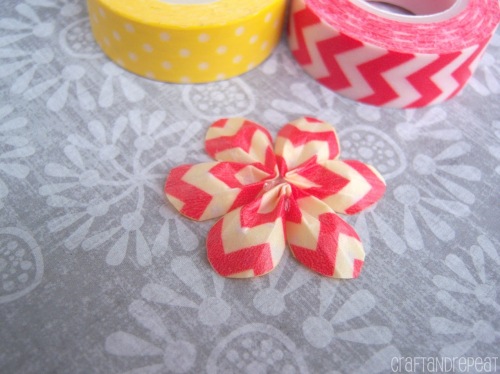
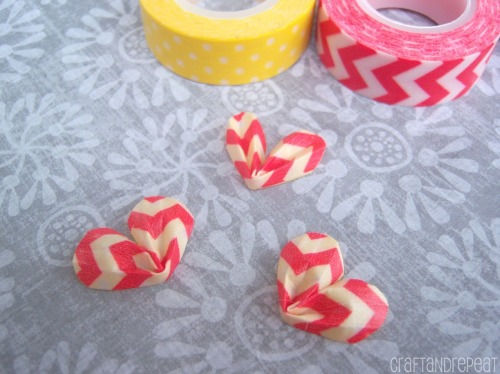
Glue (I suggest hot glue) and arrange the 3 completed petal pieces on the circle.

Washi tape flowers, butterflies, and hearts. Free tutorials with lots of pictures!
The length of the stem is up to you.  It works best if you can get your wire really straight.  If you have a nylon jaw flat nose pliers, straighten out the wire using the pliers while it’s still on the spool. If you cut it first, you’ll have a hard time holding onto it.  Once it’s straight, cut the wire.

Washi tape flowers, butterflies, and hearts. Free tutorials with lots of pictures!
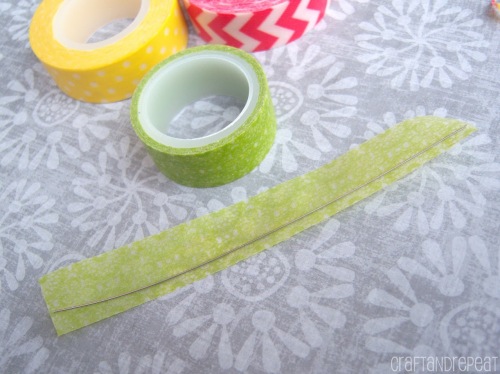
Unravel some of your stem colored washi tape and place the wire close to the edge of the tape.  Leave just enough space to fold the edge of the tape over the wire.  Cut the washi tape from the roll.

Washi tape flowers, butterflies, and hearts. Free tutorials with lots of pictures!
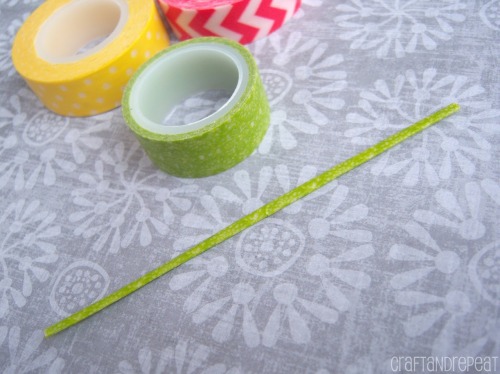
Fold over the small edge of tape you created and crease it against the wire.  Now just roll the wire and tape until you can’t anymore.

Washi tape flowers, butterflies, and hearts. Free tutorials with lots of pictures!
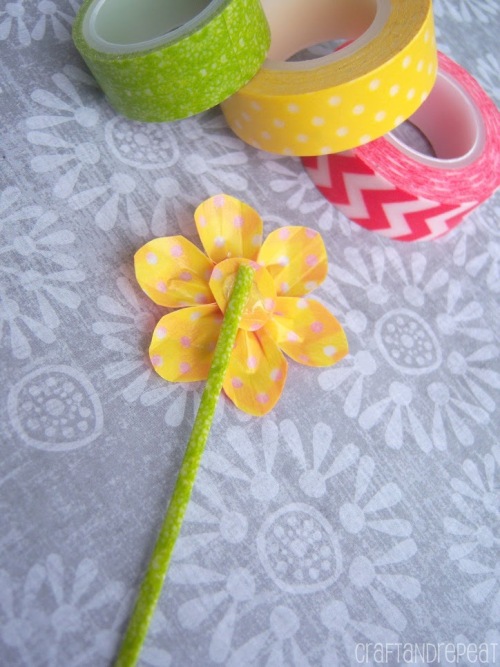
Glue it to the back of your flower (again, I suggest hot glue).

Washi tape flowers, butterflies, and hearts. Free tutorials with lots of pictures!
That’s it! You can bend the wire to arrange the flowers.  Make a whole bunch in different colors and sizes to create a bouquet.

Washi tape flowers, butterflies, and hearts. Free tutorials with lots of pictures!
Use the same folding technique and stems to create butterflies and hearts!

~~~

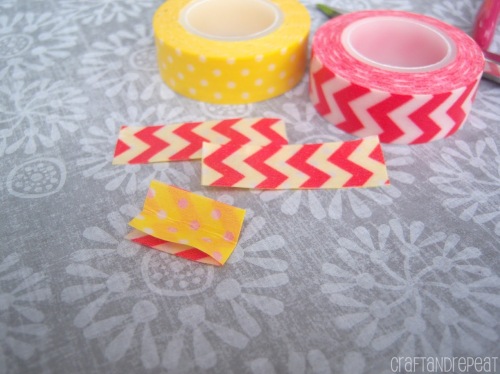
The spires I used in my contest entry are really easy to make.  I have to give credit to my parents (not sure if it was Mom or Dad) for teaching me how to do this.  When I was a kid, my parents would take my brothers and me to Pizza Hut to get our free personal pizzas from the Book It school reading program.  Do they still do this? Anyone know what I’m talking about?  I’m sure they no longer use the big pin on buttons they used when I was in grade school!  If you have no clue what I’m talking about, THAT IS OK! The point is, while we were waiting for our pizza and sipping on our sodas, we would take the empty straw wrappers and make these fun little spires to pass the time. Confession: I STILL do this anytime I have straw wrappers at a restaurant! Fun fact: Pizza Hut was where T took me on our first date as a couple, and I clearly remember doing this to calm my giddy nerves!
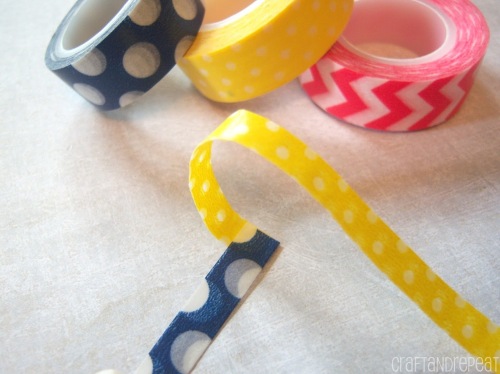
The Supplies
1.
1 -4 colors of washi tape all the same width (the tutorial uses 2 colors)
2. clear drying glue (I used Mod Podge)
3. a Q-tip or small paint brush for the glue
4. scissors

The Directions
Washi tape spire/chain.  Tutorial with pictures.
Fold the washi tape over on itself lengthwise to create a long strip.  I found it easier to keep it on the roll.  Do the same with the other color of washi tape.  The length of the strip will affect how long the spire will get.  Cut both strips to the same desired length.

Washi tape spire/chain.  Tutorial with pictures.
Glue the ends together to create a 90 degree angle.  To make it look more uniform, have your folded edges on the outside.  If you’re using one color, you only need one strip and can fold it in the middle to look like the red one in the picture.

Washi tape spire/chain.  Tutorial with pictures.
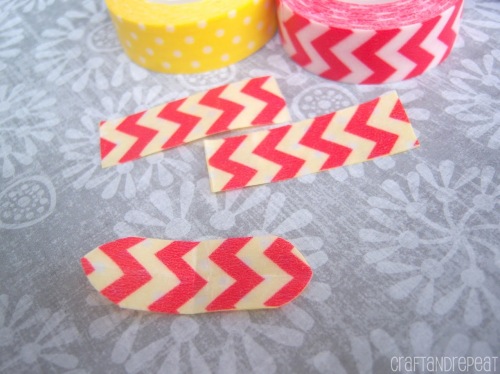
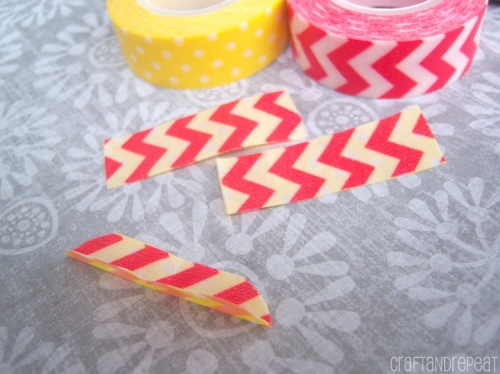
Once the glue is dry, take the strip that is on the bottom (the yellow one)  and fold it over the top strip (the blue one) creasing it where it meets the edge of the top strip.  The blue one is now on the bottom.  Fold it the same way over the yellow one.

Washi tape spire/chain.  Tutorial with pictures.
Continue folding this way until you reach the ends.  It’s best to hold onto the completed folds while you work and keep them squished together.

Washi tape spire/chain.  Tutorial with pictures.
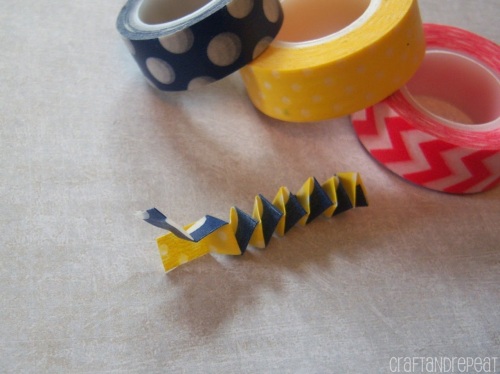
If the end pieces are too small to complete a fold, just cut them off.  Glue the ends together.

Washi tape spire/chain.  Tutorial with pictures.
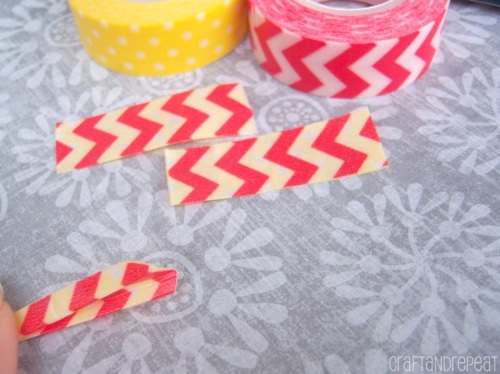
Let go of your folds and it will spring out into a fun spire!  You can also make larger, 4 colored spires by doubling 2 colors of tape for each strip. Think of all the fun ways you can use these!  Cards, scrapbooking, washi bracelets and earrings, and of course as floral decorations!  These can easily be made using strips of paper as well.

Hope you enjoyed these tutorials and have learned some new ways to use your washi tape!

Remember, if you post about this project, please be sure to give me credit and link back to me or grab a button from the sidebar. Thanks!

Your opinions and thoughts mean a lot to me.  I would love for you to leave me a comment below.  Thanks for stopping by today!

14 Comments

Filed under DIY - Do It Yourself, Free Tutorials, One Crafty Contest, Washi Tape

Wet Canvas Silhouettes – Painting with Water

Wet Canvas Silhouettes - A water and acrylic painting technique I made this painting as an entry for round one of the 2013 One Crafty Contest. I’m so proud of how it turned out, and it was good enough to get me voted to the next round! A BIG thanks to those who voted!! Would you believe me if I told you I didn’t use a paintbrush? Ok, so I did use a foam brush to paint the black background, but the sunset was painted with water. What? Water? Yep! Keep reading, and I’ll tell you how!

tree12
First I needed to make my stencils to create the tree and jumping boy silhouettes.  I don’t own a Cricut or a Silhouette cutting machine (oh, how I wish I did!), so I freehanded the shapes on the back of vinyl and carefully cut them out with a sharp scissors.

(The in-progress shots aren’t the best quality since they were taken in bad lighting late at night.  It’s the best time to work, since both of my boys are sleeping!)

Hand sketched vinyl stencils
I painted my canvas completely black with a foam brush, let it dry, and put the vinyl stencils on.  I actually really liked how it looked at this point with the black and white contrast.  The contest required us to feature paint in our entry, so one layer of black paint wasn’t going to cut it!

Painting over stencils
I did a few things to ensure my stencils would come away with clean lines.  I used a credit card to smooth down the vinyl and get all the bumps and bubbles out.  I put a lot of pressure on the edges of the stencils to make sure they really stuck.  Then I painted another layer of black over the entire canvas and the stencils.  That way if any color was going to bleed under the stencil it would be the color that was already there!  This technique works well when you’re painting designs with painter’s tape too.  The second layer of paint also helped glue the stencils down and provided a barrier for the next step.

tree4
After everything dried, I used a spray bottle filled with water to completely soak my canvas.  I was a little nervous about this step not knowing if my stencils would hold on, but they did.  I squeezed my paint directly on the canvas and used the spray bottle as my paintbrush to push the paint around.  It’s amazing all the ways you can manipulate paint with water!  A light misting will blend colors, a sideways stream will move the paint, and a heavy soaking will streak the paint.  I had a lot of fun experimenting with the spray bottle. In the picture above, the paint is still wet and heavily soaked with water.  It took a really long time to dry!

tree5
Once the paint had started to dry, but before it was completely dry, I removed the vinyl stencils. Then I just let it dry the rest of the way. All that’s left to do is hang it up!

Wet Canvas Silhouettes - A water and acrylic painting technique

Wet Canvas Silhouettes

Wet Canvas Silhouettes

Wet Canvas Silhouettes

Wet Canvas Silhouettes

Wet Canvas Silhouettes

Here are some other canvas projects you might enjoy:
The Earth Without Art Wall Art DIY Wall Art- You Don't Have to be an Artist DIY Wall Art- Textured Mixed Media

Remember, if you post about this project, please be sure to give me credit and link back to me or grab a button from the sidebar. Thanks!

Your opinions and thoughts mean a lot to me.  I would love for you to leave me a comment below.  Thanks for stopping by today!

10 Comments

Filed under One Crafty Contest, Wall Art

One Crafty Contest

If you’ve been following along on Facebook or Google+ you know by now that I’ve been voted in as one of the contestants in the One Crafty Contest! I’m so excited to be a part of this!

Anyone who wanted to enter could submit a photo of a project they made. Voting was then open to the public to vote for their top 10 favorite projects. I feel so honored to have made the cut! I’m now 1 of 20 contestants.

Wire Wrapped Agate PendantWire Wrapped Agate Pendant
This was my entry.

There are 5 rounds to the contest. Each week we are told what our material for the round will be. It must be featured in our project. For example, the first round’s material is PAINT!

Voting is open each Monday. So be sure to vote for your favorites! The rules prohibit me from telling you which projects are mine, so hopefully I make it into your favorites! Only so many contestants will move on each round until a winner is announced. There are also winners per each round.

Even if I don’t make it past the first round, I’m still just as honored to be a part of it. There are a lot of talented ladies in the competition and I can’t wait to see all the crafts they come up with! Make sure to follow me on Facebook or Google+ to stay up to date on the competition and all things CraftandRepeat! Links are in the sidebar.


A huge thanks to Amy at One Artsy Mama for hosting this awesome competition! Make sure to visit her blog. She has some mad crafting skills.

4 Comments

Filed under One Crafty Contest