Here’s a project I’ve been waiting, and waiting, and waiting to do.
It involves spray painting, so I’ve really just been waiting on the warm weather.
Just when I think it’s getting warm enough to spray paint.. NOPE!.. we’re hit with a blizzard.. in the middle of April!
Well, we’ve had 2 days in a row that have been in the 80’s, and no snow in the forecast. So I figured it was finally time to conquer this upcycling project!

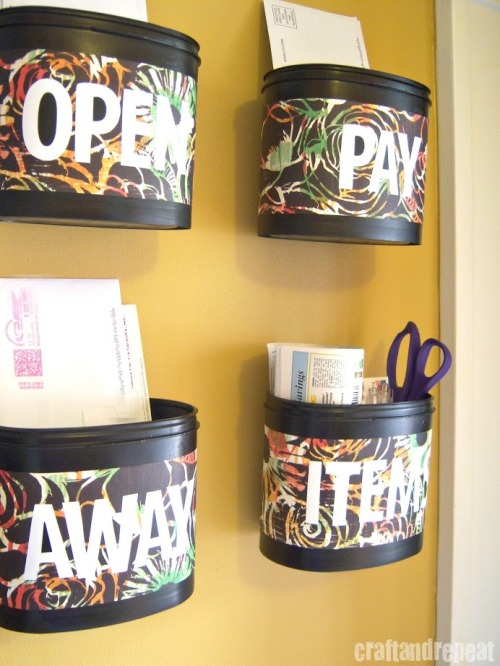
Here’s the plan: to turn formula tubs into a mail center. Are you excited? Here’s the how to..
The Supplies
1. clean, dry formula tubs
2. spray paint that adheres to plastic
3. scrapbook paper or fabric
4. scissors and ruler or paper cutter
5. lettering – stencils, cutouts, stickers, stamps, vinyl – you choose
6. glue – I used Mod Podge
7. soda can tabs
8. hot glue
The Directions
Start with clean, dry formula tubs. If you can’t get your hands on some formula tubs, I’m sure there are other items that would work. For instance, the french fried onion tubs are similar, but just a little smaller.
(Let me just say, I’m all for breastfeeding! But my health and the medications I take made that a challenge for me, so that’s why I have these tubs)
Carefully pop the covers off. If you do this too fast, the little plastic rods will snap and go flying. The covers are fairly easy to take off.

Spray paint the tubs. Mine only took one coat, but it was a paint and primer in one.

You may want to paint the insides to give them a more uniform look.

Next, take your scrapbook paper or fabric and cut it into strips. My paper was 12 x 12. It wasn’t long enough to wrap all the way around the tub, but enough to cover the sides that would be showing.
I cut my paper at 3.5 inch intervals. So my strip size was 12 x 3.5. You can of course make wider or narrower strips depending on how much of the paint you want to show or how big your letters are.
My paper cutter has been on the winning side of hide-and-seek since we moved to this house almost 2 years ago. I was pregnant at the time, so family helped pack us up, which resulted in not knowing what went in what box! There’s a lot of hiding items yet to be found. So I had to cut my strips in the more time consuming way.
I could only get 3 strips out of one paper. So for the fourth strip, I started up 1 inch from the bottom of a second piece of paper before cutting my 3.5 inch strip. That way none of the 4 strips would be identical.
Does that make sense? In other words, if I hadn’t done that, my first and fourth strip would be identical because they would be cut from the same edge of each piece of paper.
—–
I forgot to take pictures of this next part.
Glue your strips to the tub. Put glue on the center of your strip and position it on the front center of your tub. I found it easier to not have glue on the whole strip while I was trying to get it in the right position. Once you’re happy with where it is, glue down the rest of the paper.

Then I got my lettering ready. It took me awhile to decide how I wanted to do the letters. At first, I wanted to stencil them on with a creamy white paint that matched my scrapbook paper. But when I tried it out on a scrap piece, it didn’t come away with clean edges.
So I decided to go vinyl! This was actually perfect, since vinyl is repositional, you don’t have to worry about crooked, unevenly spaced letters.
Unfortunately, I’m not blessed to own a Cricut or Silhouette, so I used the same method I used to make the monogram for L’s nursery. You can read about it HERE.
I traced letters on to the back of my vinyl, making sure to trace unsymmetrical ones backwards. (ignore the extra markings in the picture, they are leftovers from a different project) Then I carefully cut out each letter.
Now add your letters! Mine say: OPEN, PAY, AWAY, ITEMS. Short words worked best for me, but yours can say what ever you want. Other examples: IN, OUT, PENS, KEYS, SUPPLIES, STAMPS, COUPONS, RECEIPTS.

We’re not only going to upcycle the tubs, but upcycle some soda can tabs! They will be used to hang the tubs to the wall.
There are different ways of doing this. The most common way is putting a screw through the little hole on the bottom of the tab to attach it to your item. Well… 1. I can never get the tabs off with those little circles in tact. And 2. I didn’t want an unsightly hole going through the container. I opted for hot glue.
I bent each tab slightly while holding it over the edge of my kitchen counter. Then, I marked the same spot on the back of each container as a guide, and glued them on. I added an extra layer of hot glue on the top to really bury the tab in glue.

Now hang them up, be proud of your work, and enjoy the organization!
We were in desperate need of a mail sorting system. We usually have random piles sitting around the house…

Like this one on the kitchen counter…

and all this opened mail that’s invaded the wine rack. There’s usually a pile or two on the dining room table, too….

But this is just so much better! And now you have a sneak peak into our kitchen makeover!
Thanks for stopping by today! If you have any questions about this project, please put them in the comment section.
Remember, if you post about this project, please be sure to give me credit and link back to me or grab a button from the sidebar. Thanks!


Pingback: Easy DIY Vinyl Monogram | craftandrepeat
Omgoshh Brianna, this is an awesome idea!! You always have the coolest and neatest crafts on here, which is why I nominated you for an award!! 🙂 Check out the instructions here…. http://www.alovelylittleaddiction.com/2013/04/i-was-nominated.html
Thanks for nominating me!
Great Idea! I use mine to store DIY Chalk Paint. Thanks for linking up at Bewitch Me and Titi Linky!
wow, what a great upcycle!!!
I came over from Made you Look Linky party!!
HongKongChic
Thanks!
These are such a fantastic idea! Love how organized you are.. can you send some organizational skills my way?
xoxo
Amie @ Pinkapotamus
I’m expecting in Oct and I’m going to save onto this for when I have a lot of leftover tubs of formula! This was such a great unique Idea! I love it. I hope you’ll come visit my linking party today over at http://www.fidlersunderoneroof.com. I call it “Fidlin’ Fridays” Hope to see you there!
Thank you! I’m on my way to join the party…. 🙂
Awesome idea, I do have some tubs like those. I was saving them for the right purpose and you just gave it to them LOL Thank you so much for stopping by and linking this up at Bewitch Me & Titi! Hope to have you there tomorrow with a new awesome creation!
You rock!
Hugs
Cami @ TitiCrafty by Camila
Thank you! I’m glad I could give you some inspiration 🙂 I definitely will be partying over at Bewitch Me & Titi, but maybe a day late. Tomorrow is my oldest’s birthday! Happy weekend!
Brianna
Pingback: Project Inspire{d} Linky Party Week #13 | Cupcakes & Crinoline
awesome idea!! and I love the can tab idea to hang them, you ROCK with your upscale self! 🙂 Michelle
Very clever! I like these!! Pinning! Thanks so much for linking up on Made in a Day last week!
Kim
Hey, Thanks for linking up!! I fixed the button for ya. 🙂 Sorry about that.
Vicky
Pingback: Six Dollar Kitchen Countertop Transformation | craftandrepeat
NOW THIS IS AWESOME! I hated throwing those jugs away so I found a few uses for them as well but nothing like what you have done! I LOVE IT! I am certainly following you! I am trying to be a bit “greener” these days and this project is totally doable! I am hosting today at http://www.frugalfitfamily.com – i would love if you could swing by and share!
Thanks so much and welcome! I’ll head over there right now!
Wow! Those turned out great – pinned this. I think this would be a great fit for Family Fun Friday if you have time and want to link up. 🙂
Monica
http://happyandblessedhome.com/category/family-fun/
Thanks. I will make sure to stop by!
Great idea!! There are SO many formula cans!! Great use for them! Thanks for linking up at Family Fun Friday at http://happyandblessedhome.com!
I do not have in formula containers, but I love this idea! I have a perfect spot for something like this. I’ll have to see what I have around the house that is similar. Thanks!
Coming over from the Family Fun Friday Party. Lover for you to visit my site as well.
Gina (http://ginascraftcorner.blogspot.com/2013/05/kids-backseat-organzier-how-to.html)
Pingback: Junk Mail Paper – Part Two | craftandrepeat